Application Settings
Application settings allows you to adjust the application settings in License Manager.
How to change Application Settings in License Manager
General Tab
The general tab allows you to adjust the settings and will affect what you can see and do in License Manager.
- Application Modes will limit the number of workspaces visible in License Manager .
- Data Management will affect how data is stored and compared in License Manager.
- Data Comparison will define the default comparison range for how License Manager will show changes to your data.
- Software Usage Management Mode will define how the responsibility for managing software usage compliance is allocated between multiple business units.
- Click Application Settings in the settings menu. The application settings are is displayed.
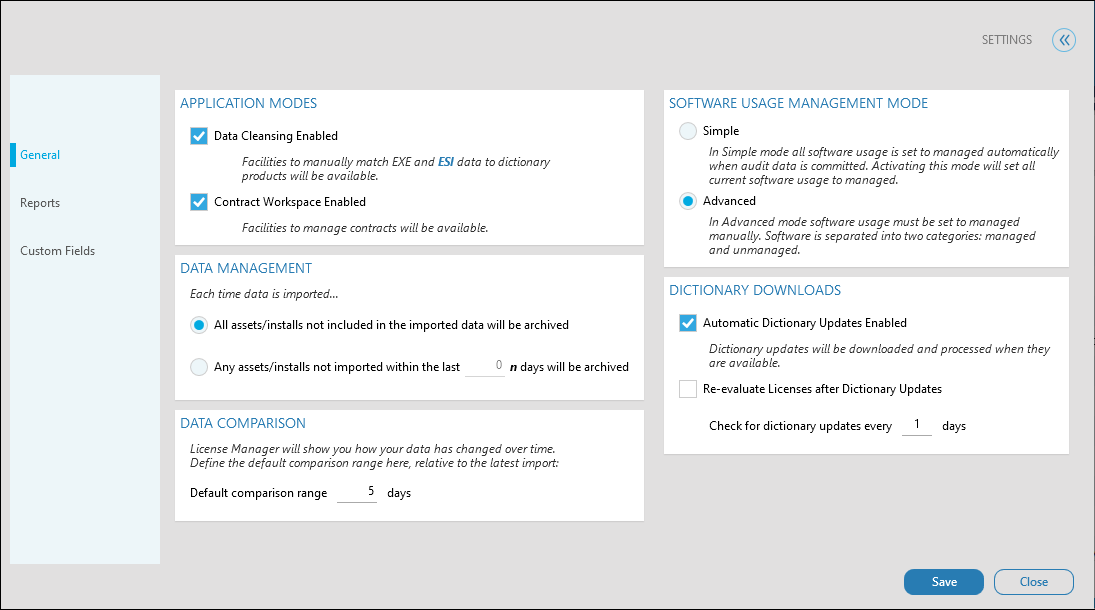
- Choose the application modes you want to apply.
- Tick Data Cleansing Enabled to enable the data cleanse workspace.
- Tick Contract Workspace Enabled to enable the contracts workspace
- Select the data management settings for your database. Each time data is imported, License Manager will add devices and installs, and decommission those that are not active. There are two options Please note, these values are displayed at the bottom of the notifications dashboard:
- All devices/installs not included in the imported data will be archived. When you import data, any devices or installations that currently exist in your database but do not exist in the new data will be archived
- Any devices/installs not imported within the last n days will be archived. When you import data, any devices or installations that currently exist in your database but do not exist in the new data will be archived after a number of days has passed. Type the number of days to wait before archiving
- Type the number of days for the Data comparison range x days field. License Manager will show how your data has changed over time. Define the default comparison range here, relative to the latest import.
- Choose the Software Usage Management Mode you want to apply.
- Select Simple to automatically set software usage to managed when audit data is committed. This is recommended if license compliance is managed strictly within each department of an organization.
- Select Advanced to manually set the management status of software usage after audit data is committed. This allows you to promote the management of software usage to parent business units before you set its management status. This is recommended if software usage is transferable between departments in an organization.
- Choose the Dictionary Downloads setting you want to apply.
- Tick Automatic Dictionary Updates Enabled to allow License Manager to download and process dictionary updates automatically. License Manager requires internet access to download the updates.
- Tick Re-evaluate Licenses after Dictionary Update to perform the Re-evaluate License task when an automatic dictionary download is complete.
- Type the number of days for the Check for dictionary updates every x days field. This determines how often License Manager will check for updates to the dictionary.
- Tick Automatic Dictionary Updates Enabled to allow License Manager to download and process dictionary updates automatically. License Manager requires internet access to download the updates.
- Click OK. The application settings have been changed.
Reports Tab
The reports tab allows you to set the sharing and auto-run settings for reports in the reports workspace.
- Click Application Settings in the settings menu. The application settings window is displayed.
- Click the Reports tab.
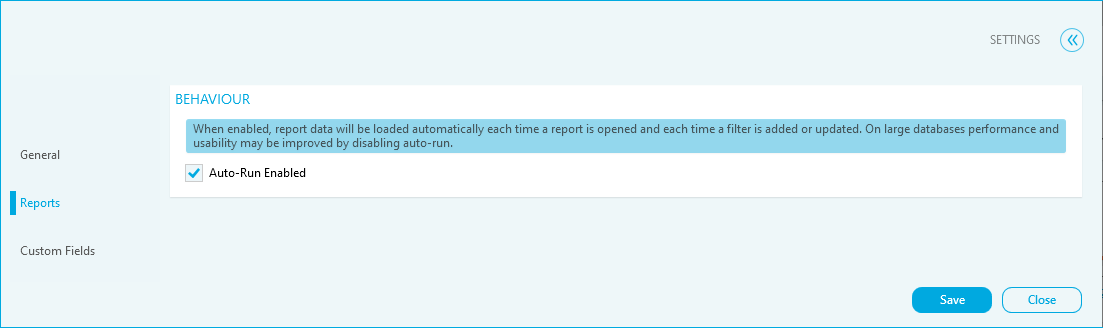
- Choose the Behaviour setting you want to apply.
- Tick Auto-run Enabled to automatically refresh the data in the report each time it is viewed.
- Click OK. The Application Settings have been changed.
Custom Fields
The custom fields tab allows you to name the user specified fields for the License details, Business Unit details, Product details, Device details, See also: View User Details..
- Click Application Settings in the settings menu. The application settings window is displayed.
- Click the Custom Fields tab.
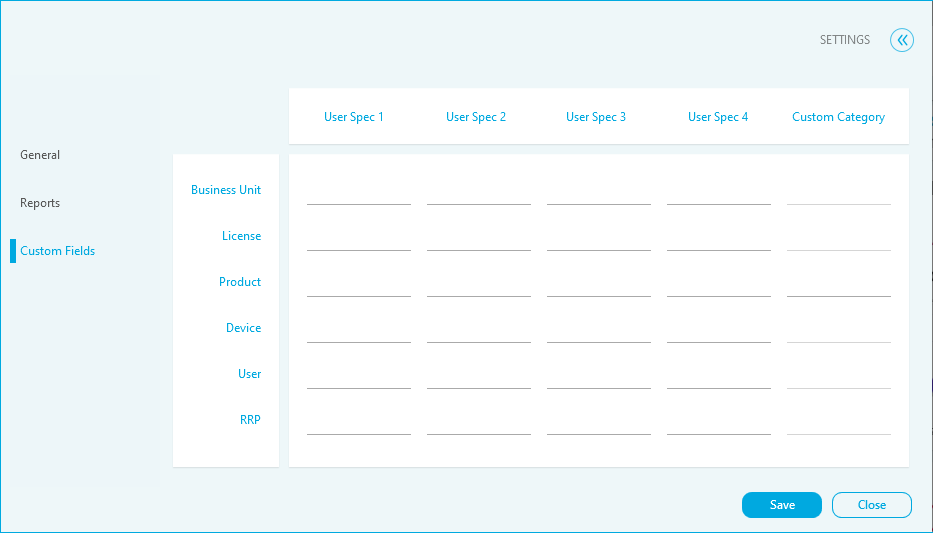
- Type to rename the fields.
- Click OK. The application settings have been changed.